
Building a HomeKit accessory
How to build a HomeKit accessory with a Raspberry Pi running Homebridge and an Arduino YUN: a gate remote and a DHT22 sensor controlled with Siri.

Translated from Italian with the help of AI and reviewed by the author.Read the original
This article is meant as a short introductory guide to building a HomeKit compatible accessory using reused, open source components. If you follow all the steps correctly, by the end you will have a remote control for your automatic home gate that you can operate with Siri / HomeKit. As a bonus, you can add an ambient humidity/temperature sensor.
Ingredients:
- 1x Raspberry Pi 3
- 1x Arduino YUN (optional)
- 1x 433MHz RF remote for an automatic gate
- 1x NPN transistor
- 1x 2.2k resistor
- 1x A few wires
- 1x DHT22 (optional)
- 5x Patience
Background
HomeKit is the Apple protocol that developers and companies making home automation hardware must adopt if they want to be compatible with the Siri voice assistant and the Home app installed by default on every new iOS device.
HomeKit is a protocol, that is, a set of rules and specifications that services must follow to be integrated quickly and easily with Apple devices. The protocol (in its non-profit developer version) can be downloaded and studied freely, provided you first accept the attached Apple license. For more information, go here:
developer.apple.comApple Developer documentationUsing the HomeKit Accessory Protocol Specification
Conceptually, to build something that works (and is useful) with HomeKit you need two macro components that talk to each other:
- A bridge or gateway that speaks the HomeKit protocol and converts all our analog and digital input / output signals into characteristics exposed to the HAP protocol.
- One or more accessories able to talk to the server.
Typically, accessories are very simple, elementary objects (light bulbs, switches, temperature sensors, etc.). For reasons of cost and compactness, it is hard to implement on them the logic needed to talk to the server as well.
The most common solution, adopted by most manufacturers, is to add one more layer of indirection, called a HUB, that "collects" several elementary devices under a single collector, which then has the logic needed to talk to the server; IKEA's and Philips's smart living lines work on this principle. As a result, accessories are lighter and cheaper, at the price of one more object in the chain. That is not a big complication or problem, considering that it noticeably lowers the overall cost of the final objects.
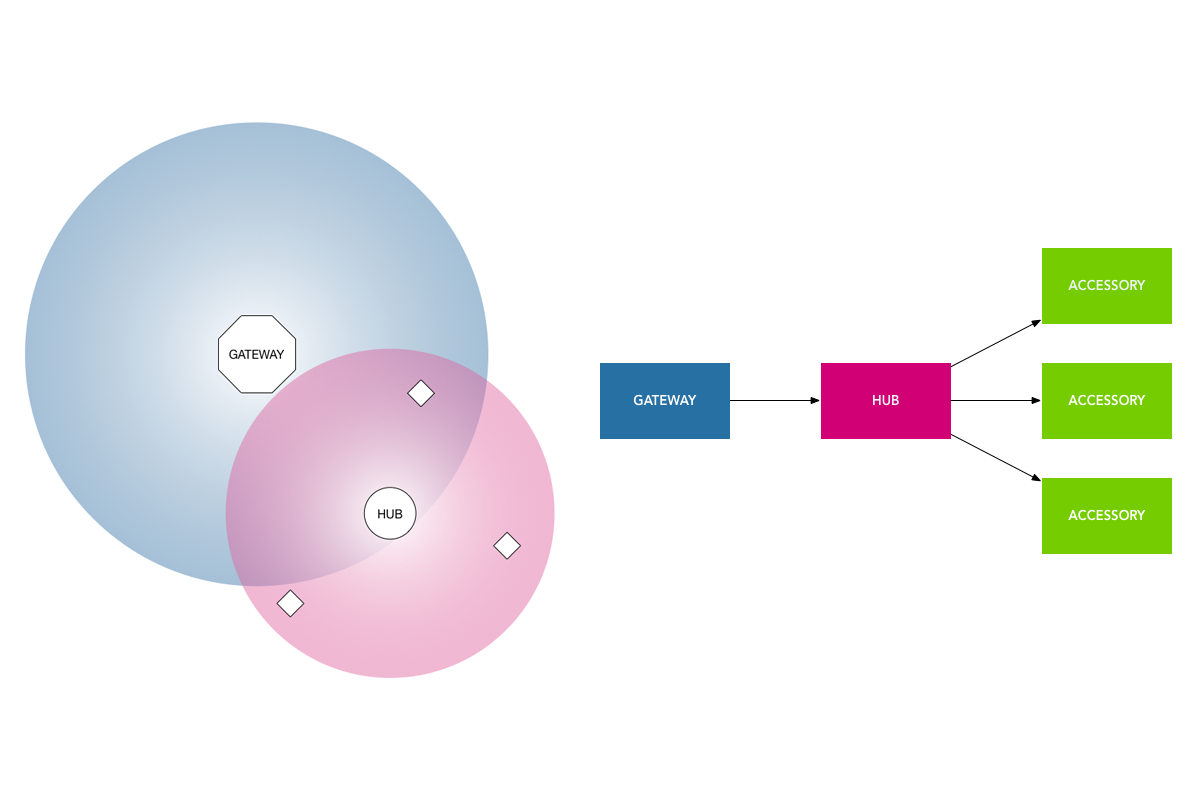
Fortunately, for the gateway there has been a stable and modular open implementation for some time. It is based on node and implements all the features and specifications the HAP protocol requires to build a gateway for HomeKit accessories.
How it works is very simple. A configuration file declares the accessories supported by the gateway. These accessories are nothing more than software plugins, each representing a particular exposed characteristic. The configuration file is a plain JSON file and the accessories are JSON objects belonging to an array. Some parameters of each accessory are mandatory, others are optional and depend on the specific implementation, since they are initialization parameters.
Implementation: Gateway
First we will set up our gateway. For this I decided to use a Raspberry Pi 3 on which I had previously installed Raspbian JESSIE:
To install homebridge, just follow the instructions on the project's GitHub page. I ran into no difficulty.
Once the installation is complete, we can launch our gateway with the homebridge command. On first start, the server warns us that no accessories are configured, so the gateway is not very useful yet.
There is a very active community on npm and you can find a plugin for almost any need you can imagine. In our case we will build an accessory to open an automatic gate, that is, to drive a "stateless" switch of an RF remote. If we want, we will also add a humidity and temperature sensor that gives us useful information (at practically zero cost) in the room where we place our HomeKit hub.
Before building our sensors and configuring our HUB, we need to complete the gateway setup by adding two modules that can talk properly to the sensors described above:
npmjs.comhomebridge-http-temperature-humiditySupports https devices on HomeBridge Platform.
once installed, they are available right away. We only need to configure homebridge's config.json file accordingly.
{
  "bridge": {
    "name": "Home1bridge",
    "username": "CD:32:D2:E1:CC:33",
    "port": 50800,
    "pin": "031-43-153"
    },

  "description": "This is an example configuration file.",

  "accessories": [
    {
      "accessory": "HttpTemphum",
      "name": "Soggiorno",
      "url": "http://yuji.local/arduino/temp",
      "httpMethod": "GET",
      "humidity": true,
      "cacheExpiration": 60
    },
    {
      "accessory": "HTTP-SWITCH",
      "name": "Cancello",
      "switchType": "stateless",
      "onUrl": "http://yuji.local/arduino/switchOn"
    }
  ]
}
Apart from trivial parameters such as the name and the room, each module expects to talk to an HTTP address and receive certain responses for the requested operations; we only need to implement this simple logic to complete the job. The gateway takes care of everything else needed to talk correctly with Apple's HAP protocol.
Implementation: HUB and sensors
To build our HUB, which groups the sensors and talks to them, I decided to use an old Arduino YUN that I had bought for another project and left in a drawer. If you prefer, though, you can use the same Raspberry Pi you used to build the gateway. You just need to adapt the concepts I am about to describe.
Our HUB must implement an HTTP server that answers the endpoints specified in the homebridge configuration file above, returning the values read from our sensors, which are connected to the input/output pins of the Arduino microcontroller.
Before writing the code for our Arduino, though, let's take a break and enjoy a bit of electronics, building what we need to turn an ordinary RF remote for automatic gates into one driven by Arduino.
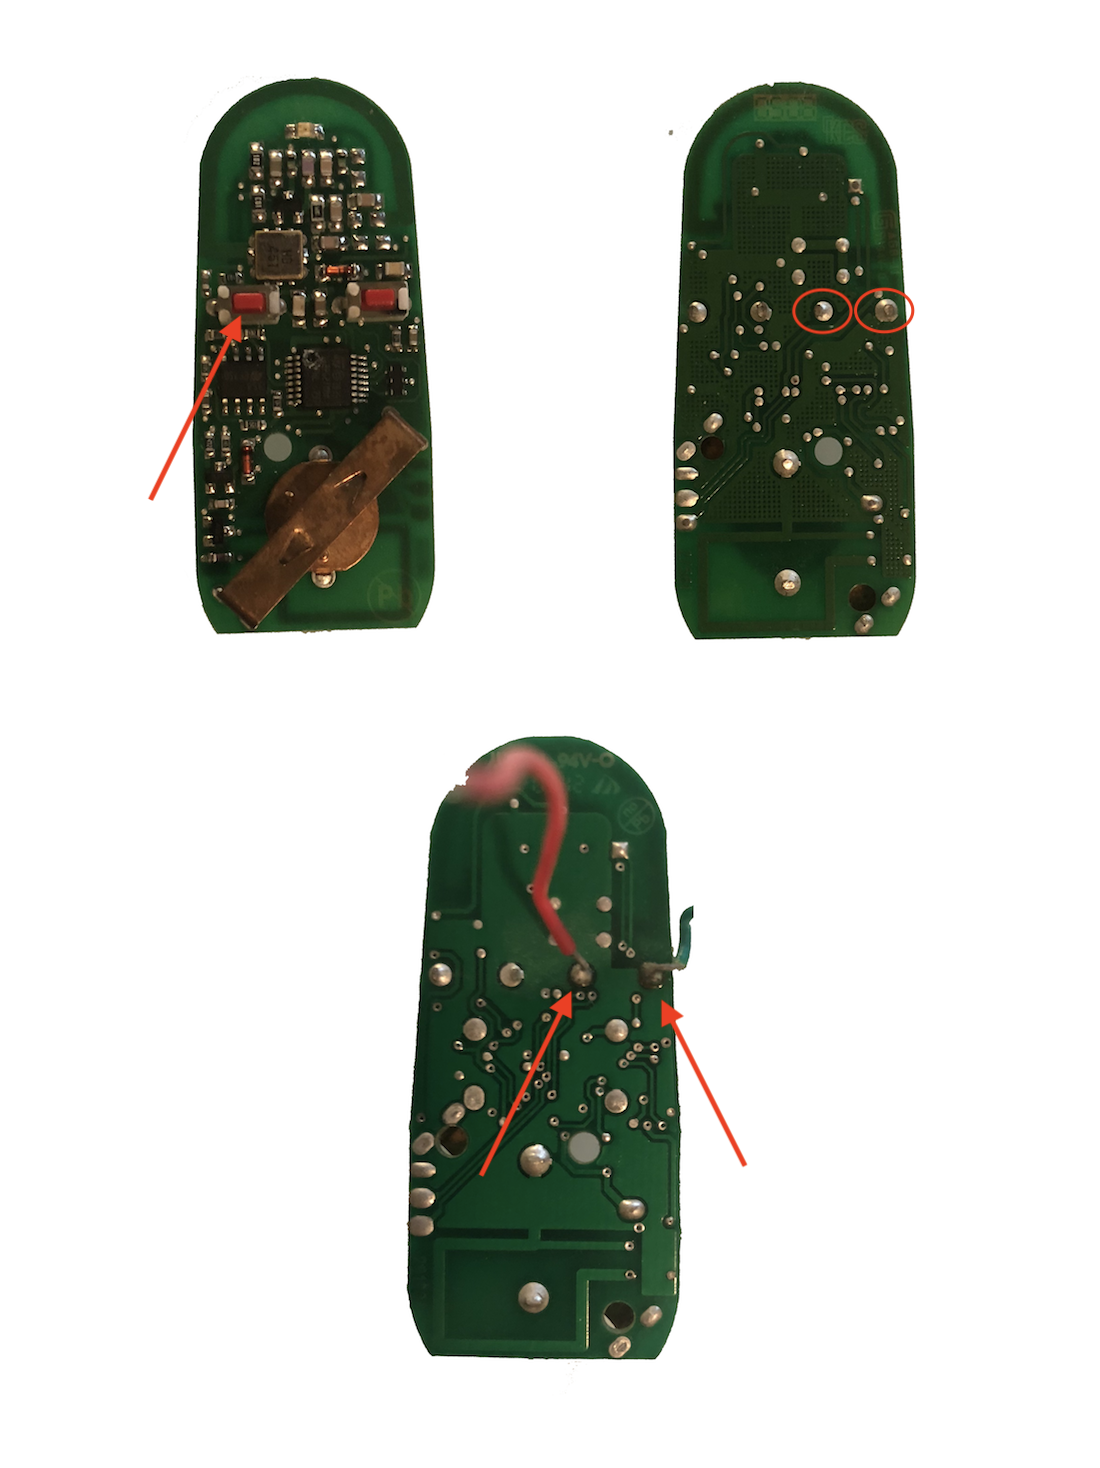
First we need to find the pins of the remote's open button and solder two short pieces of wire to them.
Meanwhile we will have placed our N-P-N transistor on a breadboard, suitably configured with a 2.2k resistor on the control line.
The base of the transistor goes to Arduino pin 7. The emitter goes to one of the wires we just soldered onto the remote. The collector is connected to one end of the remote's button and to Arduino's ground.
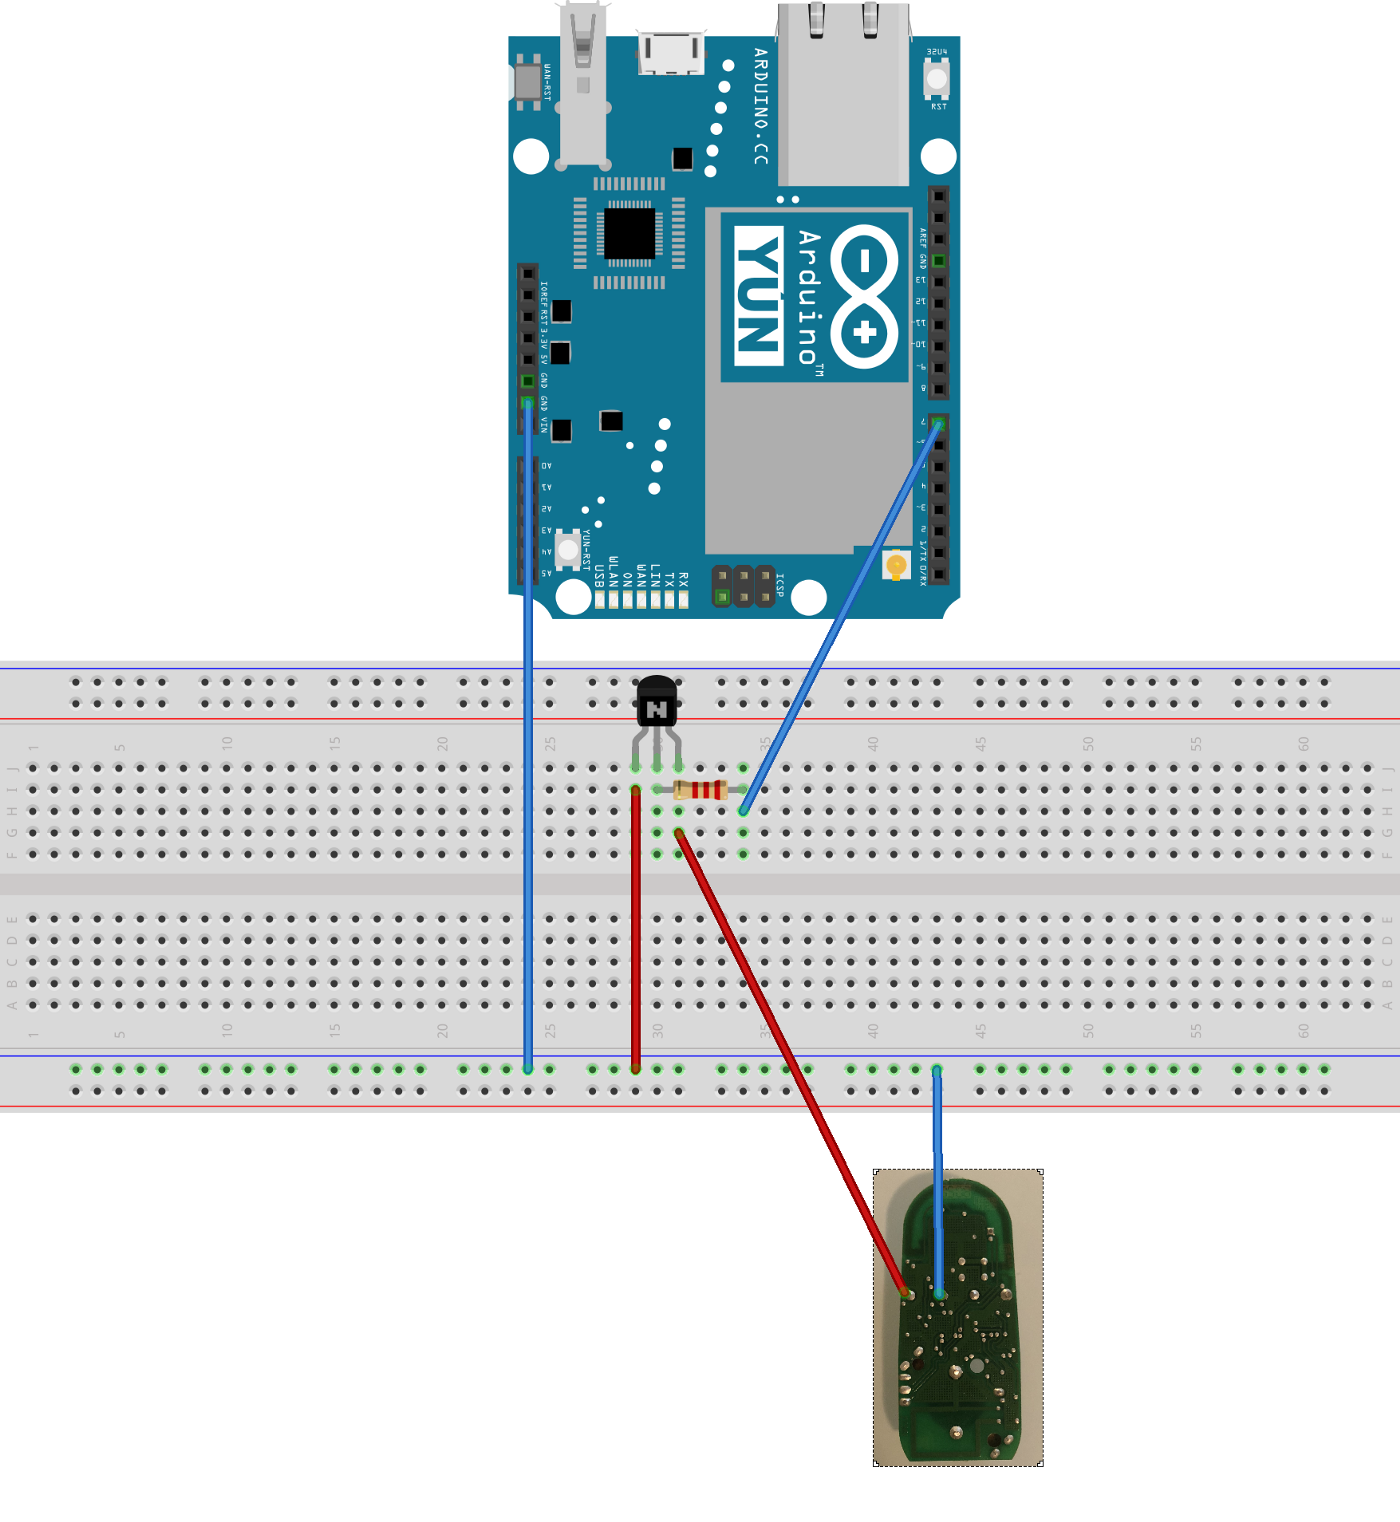
This way we create a normally open circuit that closes (effectively pressing the remote's button) only when a pulse above a certain threshold arrives from the digital pin. What remains is to encode all this in a language our microcontroller understands.
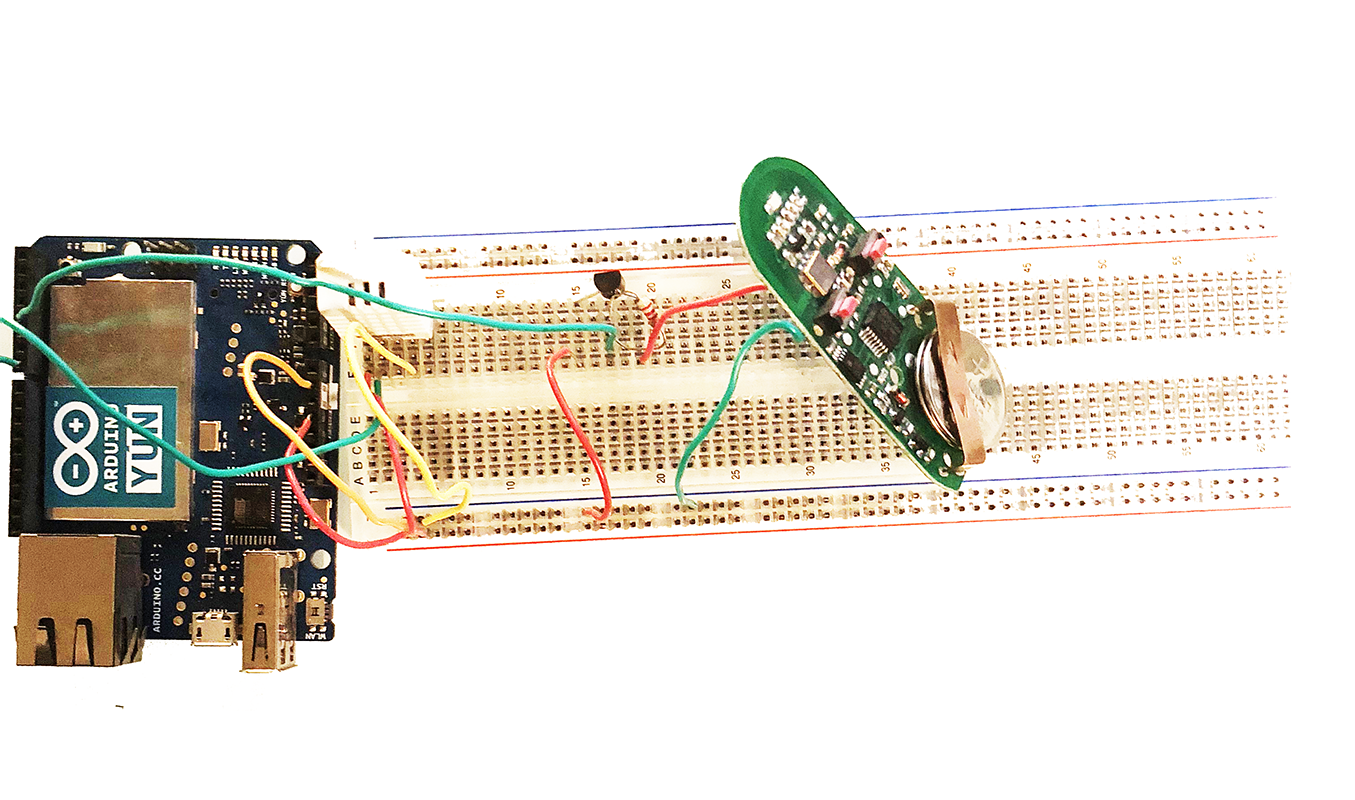
Arduino YUN is a very interesting hybrid platform made of a Linux server, a WiFi module and an AT microcontroller (very similar to the one used on the Arduino Uno). Arduino's strength, compared to other competitors, is being absolutely simple and effective at handling analog/digital input/output, with a programming language based on C that is quick to learn. To energize our pin 7 above, a few lines of code are enough:
digitalWrite(7, HIGH);
delay(2000);
digitalWrite(7, LOW);
to the above we need to add the logic for the HTTP server. Arduino YUN already includes a mini HTTP server/client platform, exposed very simply through two library objects called ClientBridge and ServerBridge. The server bridge listens for requests coming from the outside world and the client is used to write our replies to whoever called us.
/*
  A simple HomeBridgeHub example for HomeBridge
  Author: Costantino Pistagna
*/

#include <dht.h>
#include <Bridge.h>
#include <BridgeServer.h>
#include <BridgeClient.h>

dht DHT;

BridgeServer server;
String startString;

#define DHT22_PIN 7
#define REMOTEDOOR_PIN 4

void setup()
{
  pinMode(REMOTEDOOR_PIN, OUTPUT);
  digitalWrite(REMOTEDOOR_PIN, LOW);

  Bridge.begin();

  server.listenOnLocalhost();
  server.begin();
  Process startTime;
  startTime.runShellCommand("date");
  while (startTime.available()) {
    char c = startTime.read();
    startString += c;
  }
}

void loop()
{
  BridgeClient client = server.accept();
  if (client) {
    String command = client.readString();
    command.trim();
//    Console.println(command);
    if (command == "temp") {
      int chk = DHT.read22(DHT22_PIN);
      switch (chk)
      {
        case DHTLIB_OK:
        client.print("{ \"temperature\":");
        client.print(DHT.temperature-2);
        client.print(", \"humidity\":");
        client.print(DHT.humidity);
        client.println("}");
        break;
        case DHTLIB_ERROR_CHECKSUM:
        client.println("{ \"status\" : \"Checksum error\"");
        break;
        case DHTLIB_ERROR_TIMEOUT:
        client.println("{ \"status\" : \"Timeout error\"");
        break;
        default:
        client.println("{ \"status\" : \"Unknown error\"");
        break;
      }
    }
    else if (command == "switchOn") {
      client.println("{\"status\" : \"OK\"}");
      digitalWrite(REMOTEDOOR_PIN, HIGH);
      delay(2000);
      digitalWrite(REMOTEDOOR_PIN, LOW);
    }
    client.stop();
  }
  delay(50);
}
What remains is the temperature sensing. The DHT22 is a digital sensor that is excellent for this purpose: inexpensive and digitally accurate, it needs no calibration and can be used with one of the many available libraries for DHT devices.
github.comDHTlibArduino library for DHT temperature and humidity sensor. AVR optimized
- pin 1 is the power pin
- pin 2 is the pin where data is modulated and serialized
- pin 3 is unused
- pin 4 is ground.
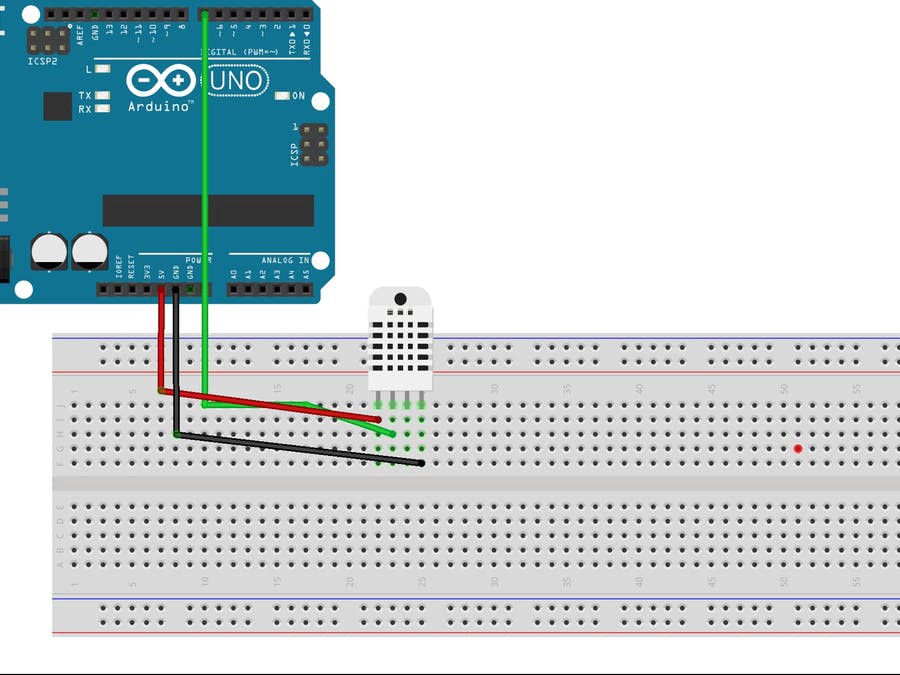
we will connect pin 2 to pin 4 of our Arduino YUN.
reading temperature and humidity is also very simple here:
int chk = DHT.read22(DHT22_PIN);
switch (chk)
{
    case DHTLIB_OK:
    client.print("{ \"temperature\":");
    client.print(DHT.temperature-2);
    client.print(", \"humidity\":");
    client.print(DHT.humidity);
    client.println("}");
    break;
    case DHTLIB_ERROR_CHECKSUM:
    client.println("{ \"status\" : \"Checksum error\"");
    break;
    case DHTLIB_ERROR_TIMEOUT:
    client.println("{ \"status\" : \"Timeout error\"");
    break;
    default:
    client.println("{ \"status\" : \"Unknown error\"");
    break;
}
Conclusions: wrapping it up
Good. It is time to put all the pieces together. Once the sketch is running on our Arduino, let's check that all the commands work correctly:
/temp
/switchOn
At this point we just need to start homebridge and configure the Home app by scanning the QR code that appears on screen and following the steps shown by Apple's Home app. In the end we will have something like this on screen:
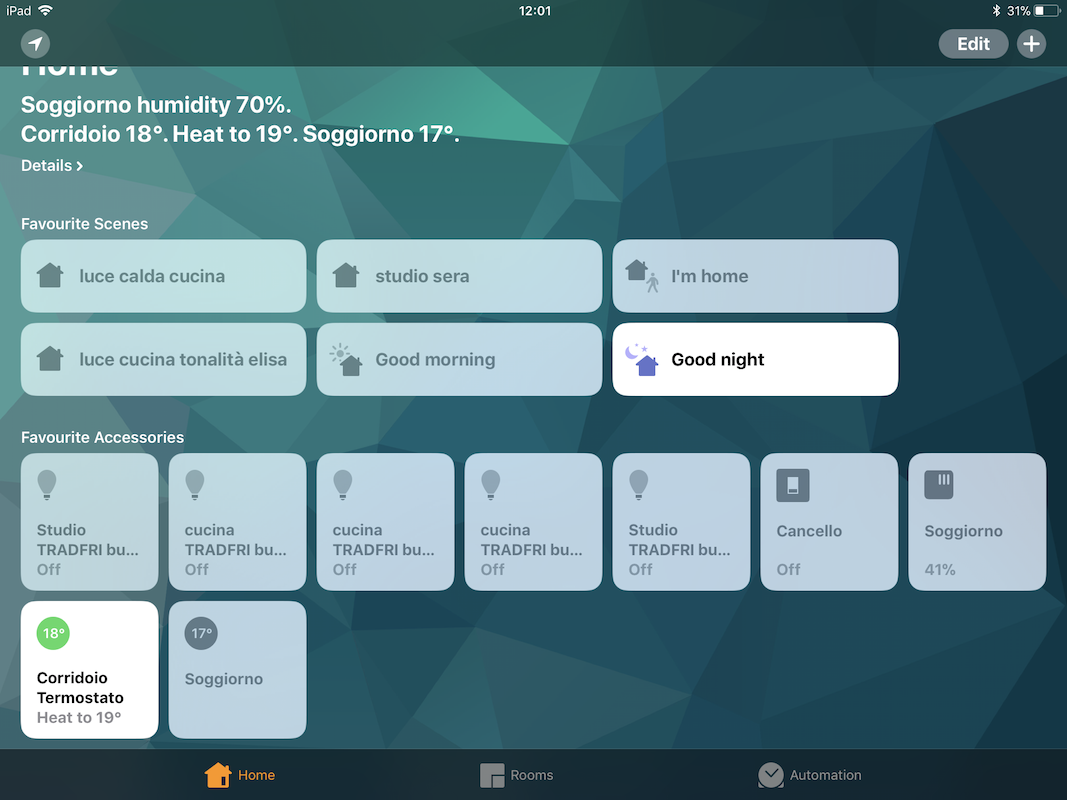
and the ability to talk to our beloved device by asking it:
What's the temperature at home?
or:
Open the gate
Final thoughts
homebridge is a very flexible open platform that lets you talk to Apple's HAP protocol quickly and effectively through small modules and simple HTTP based technologies.