
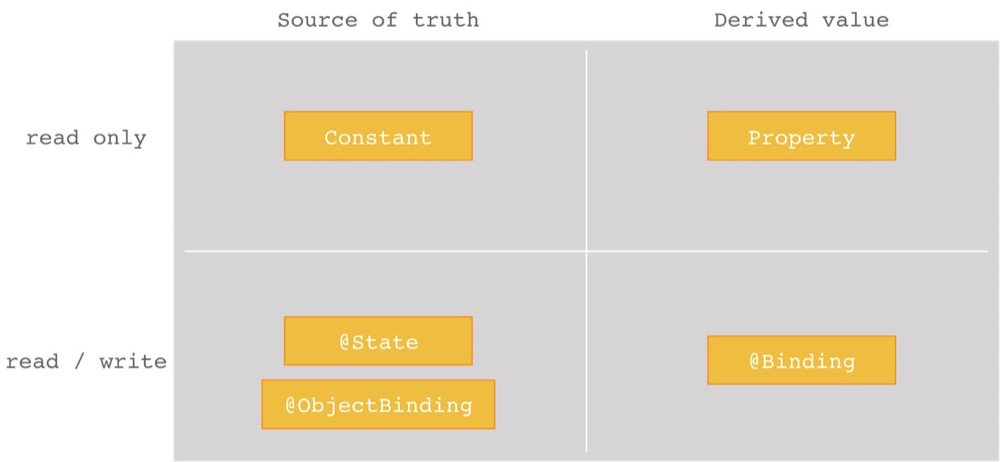
In a previous article we have seen that in SwiftUI is possible to associate one or more states to a View through the modifier @State; the latter must be used with value types allocated within the declaring View. This way our application is able to autonomously understand when to update the user interface with respect to the changes made to our variable marked with @State which, we recall, is identified as a source of truth.
But what if our source of truth is a complex object designed, for example, as a class construct? In this case @State will fail in its intent because it is designed to work exclusively with local properties of our View.
SwiftUI provides a better further concept to dialogue with that case: @ObjectBinding. The latter could be used in all cases in which the property is passed by reference such as in the class case.
struct MyCustomObject : View {
    @ObjectBinding var myObject
    var body: some View {
        Text(myObject.someTextProperty)
    }
}
BindableObject protocol
Properties with an associated @ObjectBinding modifier, therefore, refer to class objects. In order for a class to be compatible with the @ObjectBinding modifier, the BindableObject protocol must be adopted.
BindableObject protocol is fairly simple in its simpliest variant and requires only that our class implement a property called didChange, which will notify the subscribed View objects so that they can react correctly to visual interface changes.
class MyObject : BindableObject {
    let didChange = PassthroughSubject<Void, Never>()

    var someTextProperty:String = "" {
        didSet {
            didChange.send( () )
        }
    }

    ...
}
Combine framework and PassthroughSubject
In order to work, the code above needs to include the support for the Combine framework at the beginning of our swift file.
import Combine
Combine framework is a very powerful and somewhat complex tool that we will see in a future article. For now we just need to know that it - among many other things - provides a class called PassthroughSubject (our property didChange is an instance of this class). It is responsible to notify (Publishing) the interested parties (Subscribers) that a specific event happened.
PassthroughSubject, as the name suggests, behaves very similarly to traditional notifications made available by the Swift Foundation framework with NSNotificationCenter: the object specified as a parameter (in our case Void, since we don’t want to pass any parameter) is passed roughly and without any modification to the recipient along with a notification event that trigger a new rebuild of the view.
If you want to specify an error along with the notification, you can pass it as a second parameter. In our example we are not interested in this eventuality and it is the reason why we pass Never as the second parameter for the PasstroughSubject invocation.
let didChange = PassthroughSubject<Void, Never>()
Once an instance of type PassthroughSubject is created, it could be used to perform the publishing of our event whenever we wish to notify subscribed Views about changes in our source of truth.
To accomplish the last requirement we use the didSet construct made available by Swift which is invoked whenever the value of a propery changes:
var someTextProperty:String = "" {
    didSet {
        didChange.send( () )
    }
}
This way, when we make a change to the someTextProperty the didSet construct will be invoked. Inside it we will make a call to the send() method of the PassthroughSubject instance.Notice how we specify a Void type parameter by passing a pair of parentheses () within the method.
Doing so all objects subscribed to changes - those that have declared their property as @ObjectBinding - will know that the time has come to refresh their body.
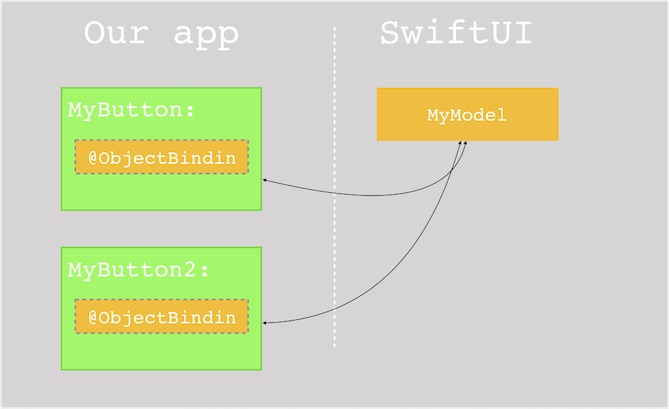
As you can see from the diagram above, our model is characterized by a single instance in memory, through a class compliant with the BindableObject protocol. Our View objects contain a reference to the original object.
This way a characteristic problem known as the duplication of the source of truth is avoided: changes to the model will be unique and characterized by an immediate update of all the views that refer our class.
An example
Let’s try to put the above concepts into practice with an example. In the previous article we had configured our CustomTableViewCell to use a variable passed by value containing a struct named Person.
struct CustomTableViewCell : View {
    var model: Person

    var body: some View {
    ...
This approach didn’t allow the CustomTableViewCell to be independent regarding updates of its own content; The variable, in fact, was copied during the CustomTableViewCell init phase.
Every change to its content was managed through a @State variable, owned by ContentView that regenerate the new cell with the new content each time a change happen.
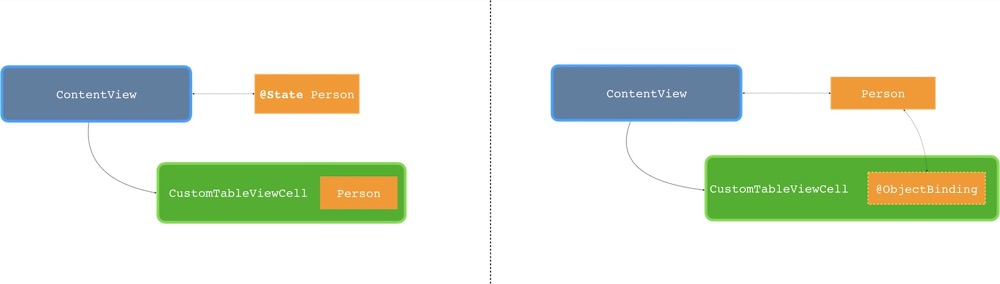
Through the use of the @ObjectBinding concept, we can make unique the Person model by passing just a reference to the CustomTableViewCell, as shown in the graph above on the right.
The first thing to do is modify our Person model to use a class that conforms to the BindableObject protocol instead of a struct.
class Person : BindableObject {
    let didChange = PassthroughSubject<Void, Never>()

    var photoName:String { didSet { update() } }
    var title:String { didSet { update() } }
    var subtitle:String { didSet { update() } }

    init(photoName: String, title: String, subtitle: String) {
        self.photoName = photoName
        self.title = title
        self.subtitle = subtitle
    }

    func update() {
        didChange.send(())
    }
}
Our new model adopts the BindableObject protocol by implementing the +didChange** property through a PassthroughSubject *instance.
Each property affected by possible changes to the visual interface ( photoName, title and subtitle ) has been adequately modified to react through the didSet construct. This way, whenever we update one of the variables, the update() function will be triggered by sending, in turn, a notification to all subscribers through the PassthroughSubject instance.
Finally, CustomTableViewCell will be modified to take advantage of the new reference model. To do this we simply prepend the @ObjectBinding modifier discussed above.
struct CustomTableCell : View {
    @ObjectBinding var model: Person

    var body: some View {
        return HStack {
            Image(model.photoName)
                .resizable()
                .aspectRatio(contentMode: .fit)
                .clipShape(Circle())
                .frame(width: 60, height: 60, alignment: .center)
            VStack(alignment: .leading) {
                Text(model.title).font(.title)
                Text(model.subtitle).font(.subheadline).fontWeight(.thin)
            }
            Spacer()
        }
    }
}
This way the CustomTableViewCell does not have a copy of the Person model. Instead it works with a reference to the memory area in which the original model is stored. Let’s see where and how to create the model to be passed as a reference.
ContentView will be responsible for such requirement, creating the actual model in memory and by passing it by reference to the CustomTableViewCell.
struct ContentView : View {
    var dataSource:[Person] = [
        Person(photoName: "photoThumb", title: "Mario Rossi", subtitle: "Amministratore"),
        Person(photoName: "photoThumb", title: "Giuseppe Bianchi", subtitle: "Consigliere"),
        Person(photoName: "photoThumb", title: "Luca Verdi", subtitle: "Funzionario"),
    ]
    var body: some View {
        List {
            CustomTableCell(model: dataSource[0])
            CustomTableCell(model: dataSource[1])
            CustomTableCell(model: dataSource[2])
        }
    }
}
List and TableView
This new version of ContentView uses a new object called List which groups elements pretty much the VStack counterpart. The difference is in the visualization: the result will be much like an UITableView from the counterpart UIKit framework
What we see above is List simplest form of declaration. In the next article we will see how to make its content dynamic, based on the declared model.
–See you soon!