
We have seen in a previous article that in SwiftUI a View is a struct that conforms to the View protocol. Therefore, it does not inherit any stored property just because there is no father at all; it is allocated on the stack and its operated by value and not by reference (as is the case with classes in UIKit).
How views works in SwiftUI
Behind the scenes, SwiftUI manages the Views with the help of an highly efficient data structure for on-screen rendering of the content. For this reason it is advisable to use and create specialized and reusable components. During development - Cupertino reassures - you should not have hesitations to extract views that perform a specific task and create for them a specific View object.
Together with the body, a View in SwiftUI defines its dependencies.
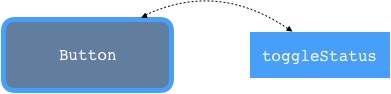
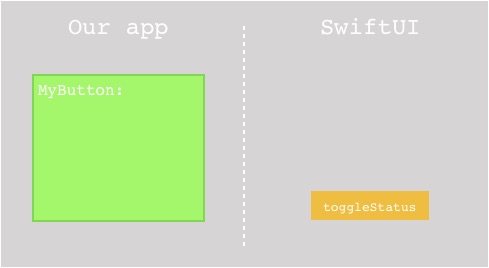
Let suppose we want to create a View in SwiftUI specialized in creating and handling a button. Simply, our object will have to take charge of managing a single scope: at its pressure, the label will have to change reflecting the new state.
That last point is where the declarative programming shines: the consequence of an action as a way to update the interface.
The @State attribute in SwiftUI
Our button, therefore, will have a dependency between its state and its representation on the screen. In SwiftUI this dependency is automatically managed by the new @State modifier. Let’s try an example to better understand this concept.
struct MyButton : View {
    @State private var toggleStatus:Bool = false
    var body: some View {
        Button(action: {
            self.toggleStatus = !self.toggleStatus
        }) {
            Text((toggleStatus == false) ? "Press Me" : "Unpress me")
        }
    }
}
@State binds the toggleStatus variable to the interface concept: whenever its value changes, SwiftUI will know that it is necessary to generate a new body (and therefore a refresh of the label associated with it).
Try removing @State from the code above. What happens and why?
Removing the @State attribute, the compiler will complain that we are trying to change an immutable value: don’t forget that we are in the presence of a struct. Every object that is rendered on the screen, in fact, is immutable for performance reasons. This way, SwiftUI knows what needs to be updated and what can be left out By adding a @State modifier, we are explicitly telling SwiftUI:
“Beware! There’s an object here that could change its state, so you’ll need to update its contents.”
Therefore, SwiftUI implicitly defines a dependency between this variable and the View on-screen presentation each time it will encounter a @State attribute. That way, whenever the variable changes value, SwiftUI will know that the View must be redrawn using the new value.
To seal this concept and see how much different it is from traditional programming, let’s try to make a joint with UIKit:
import UIKit

class ViewController: UIViewController {
	@IBOulet var aButton: UIButton!
	var toggleStatus:Bool = false

	override func viewDidLoad() {
		super.viewDidLoad()
	}

	@IBAction func buttonDidPressed(sender: UIButton) {
		sender.setTitle((toggleStatus) ? "Unpress me" : "Press me", for: .normal)
		toggleStatus = !toggleStatus
	}
}
Clearly in UIKit, the code above is not enough to render a working screen application. We will have to create a Storyboard with a UIViewController and an UIButton. We will, also, have to align the button with Constraints in the center and create the correct @IBOutlet and @IBAction references to make the whole flow working.
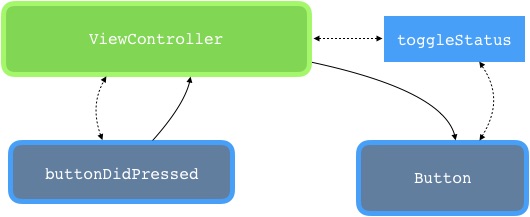
Leaving aside the obvious greater amount of code and actions compared to SwiftUI, let’s focus on our state. Also in this case, in fact, our button needs to discern the current state in order to be able to change its representation (label). Notice how, in the case of traditional imperative programming, there are two major conceptual concerns:
- toggleStatus is managed (allocated, initialized and modified) by the Controller.
- There is no clear code-level way to separate variables related to the state of the interface from traditional ones: they are all the same!
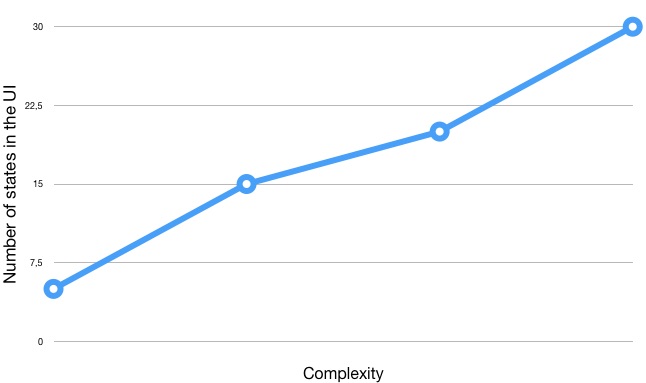
It is also evident how the complexity of this approach grows exponentially with the increasing number of objects and states.
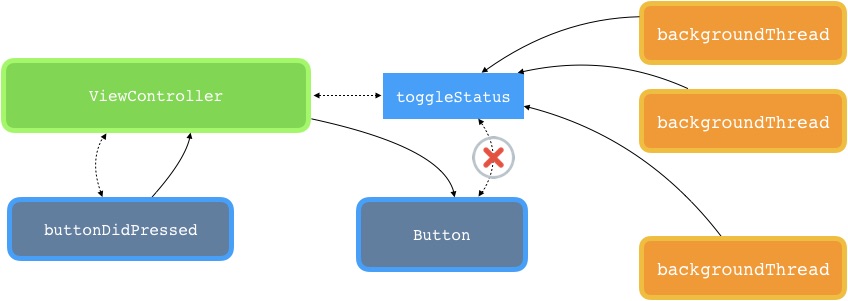
There’s one more thing we should underline there: iOS is a multithreaded operating system. This means that requests for status and interface updates can come from multiple points in the code and that threads work independently from each other. Without a clear way to handle such kind of circumstances lead to inconsistences in the UI and therefore a bugs that are hard to discover and fix.
The search for truth
But how is managed this dependency between variables and interface in SwiftUI? And what makes the system resilient and scalable unlike a traditional imperative approach?
When SwiftUI processes a View with a variable of type @State, it allocates a space for this variable in memory on behalf of the View.
By adding the @State attribute, we are able to modify an object that is otherwise immutable as a struct: behind the scenes, in fact, the variable is allocated by the SwiftUI framework in a read/write area of the application.
In SwiftUI, every possible View state (scrollview offset, button status, stack contets, etc.) is managed by this concept otherwise known as Source of Truth. Following this concept, it is possible to classify each variable either as a source of truth or a derived value.
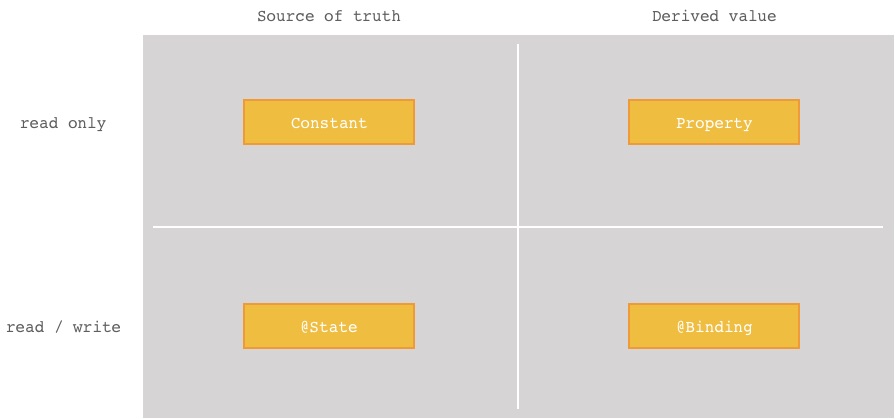
In our example above, toggleStatus is a source of truth. Moreover, from the diagram above, we could argue that all constants are also a source of truth while a simple property is a derived one.
We will see in the next chapters that there is another mechanism for passing derived read/write values, called @Binding. We will focus also in what a a derived value differs from the corresponding source of truth with a practical example. We will analyze the differences with @State and how and when to use one with respect to the other.
Organize the code: view extraction
Now that we have clear how a View updates and rebuild its content, let’s try to put together what we learned in relation to the example of the last article. Last time, we left our ContentView as follow:
import SwiftUI

struct ContentView : View {
    var body: some View {
        VStack {
            HStack {
                Image("photoThumb")
                    .resizable()
                    .aspectRatio(contentMode: .fit)
                    .clipShape(Circle())
                    .frame(width: 60, height: 60, alignment: .center)
                    .padding(EdgeInsets(top: 0, leading: 20, bottom: 0, trailing: 0))
                VStack(alignment: .leading) {
                    Text("Mario Rossi").font(.title)
                    Text("Amministratore delegato").font(.subheadline).fontWeight(.thin)
                }
                Spacer()
            }
        }

    }
}
Clearly this approach is not maintainable. The code has a tendency to nest and growing towards the right, in a so-called “doom pyramid”.
At the beginning of the article, we mentioned a mechanism for extracting subviews in order to make the code scalable and maintainable. Let’s see what the new Xcode11 and SwiftUI environment offer us to solve this problem.
Be sure to be using Xcode11 and move the mouse to the HStack tag. Holding down the CMD (⌘) state click on the tag, as follow:
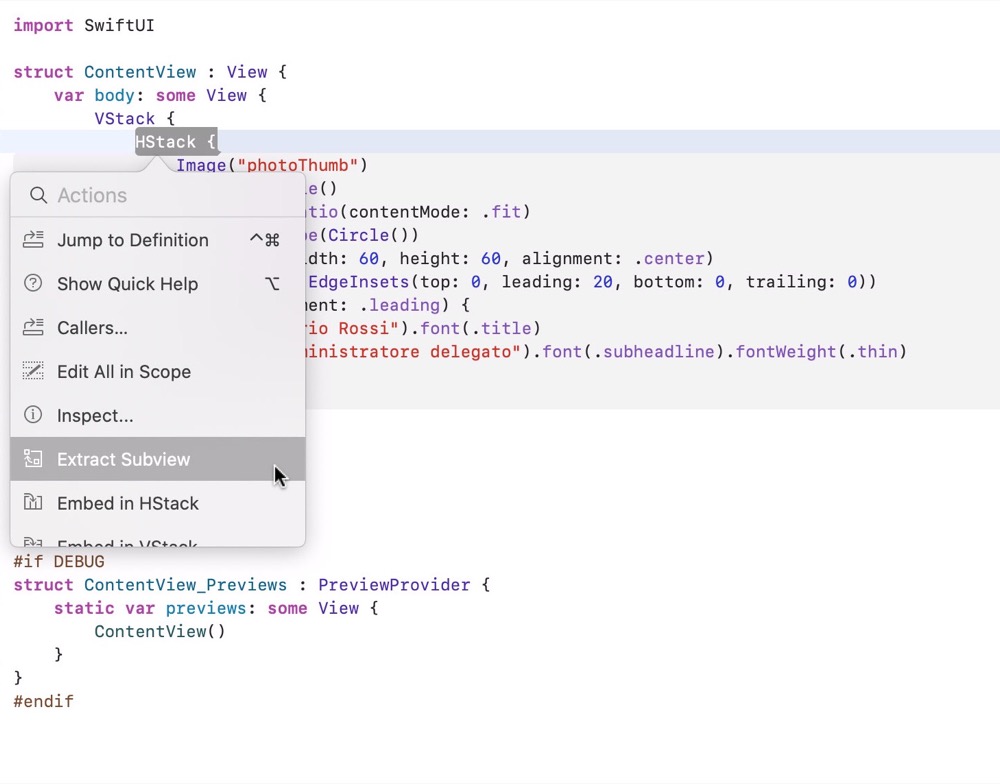
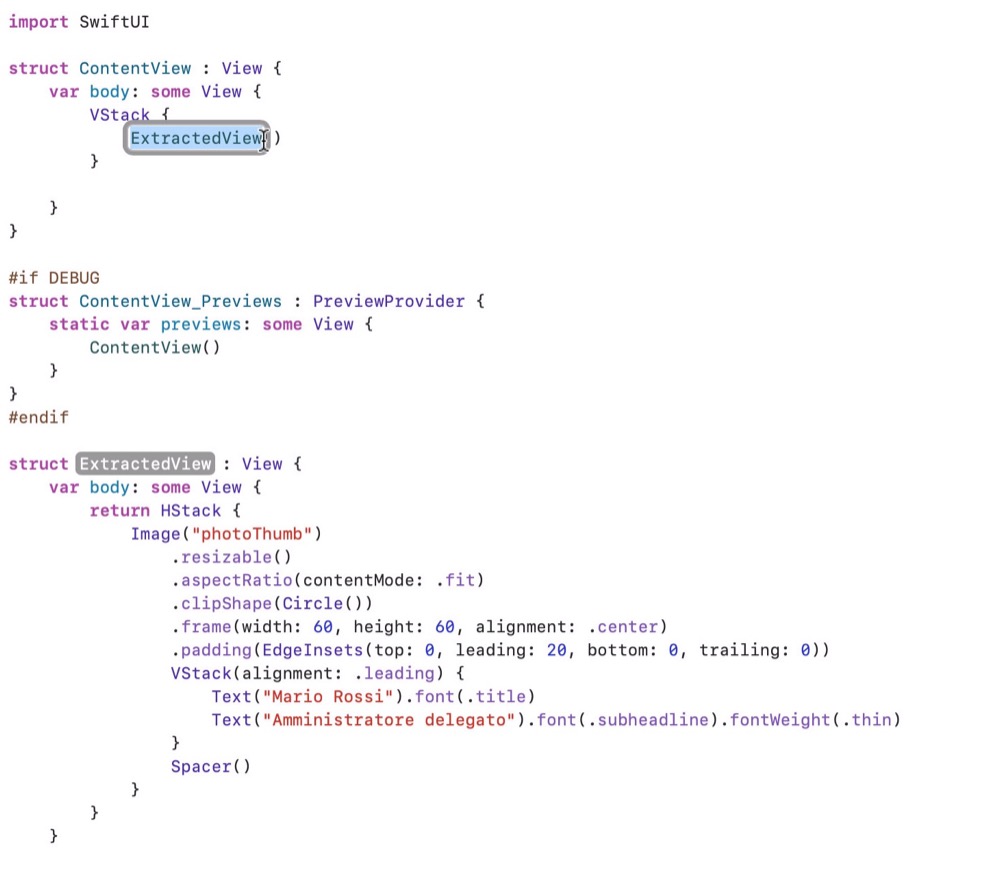
Xcode automatically creates a new struct, extracts the selected content and uses it to populate the body of the newly generated object. At the end of the operation, it also offers us the possibility of changing the name: rename the View extracted in CustomTableViewCell.
The new version of ContentView has now become much more readable and lightweight, including only a reference to a new object. As a niccce to have, we could also move the contents of the CustomTableViewCell into a new file to better isolate the concept of component.
Passing parameters
Wouldn’t it be interesting to pass the right parameters to our new CustomTableViewCell, in order to generate a cell with dynamic contents such as title, subtitle and image? Let’s try to modify our new class to get this result:
struct CustomTableCell : View {
    var photoName:String
    var title:String
    var subtitle:String

    var body: some View {
        return HStack {
            Image(photoName)
                .resizable()
                .aspectRatio(contentMode: .fit)
                .clipShape(Circle())
                .frame(width: 60, height: 60, alignment: .center)
                .padding(EdgeInsets(top: 0, leading: 20, bottom: 0, trailing: 0))
            VStack(alignment: .leading) {
                Text(title).font(.title)
                Text(subtitle).font(.subheadline).fontWeight(.thin)
            }
            Spacer()
        }
    }
}
Now, inside the ContentView, our CustomTableCell can be created with parameters that uniquely define its content.
struct ContentView : View {
    var body: some View {
        VStack {
            CustomTableCell(photoName: "photoThumb",
                                title: "Gianluca Verdi",
                             subtitle: "Consigliere")
        }

    }
}
What if we would like to go further and create, for example, a button that changes the contents of the subtitle field?
The model, the object and SwiftUI
The model linked to a View object plays a fundamental role in SwiftUI’s declarative paradigm. Each object typically has a model associated with it that, together with the state, completely identifies the user interface displayed.
For example, we could associate a model of this type with our CustomTableViewCell:
struct Person {
    var photoName:String
    var title:String
    var subtitle:String
}
As a result, our View will have to be changed in order to take advantage of the new model just created:
struct CustomTableViewCell : View {
    var model: Person

    var body: some View {
        return HStack {
            Image(model.photoName)
                .resizable()
                .aspectRatio(contentMode: .fit)
                .clipShape(Circle())
                .frame(width: 60, height: 60, alignment: .center)
                .padding(EdgeInsets(top: 0, leading: 20, bottom: 0, trailing: 0))
            VStack(alignment: .leading) {
                Text(model.title).font(.title)
                Text(model.subtitle).font(.subheadline).fontWeight(.thin)
            }
            Spacer()
            }
    }
}
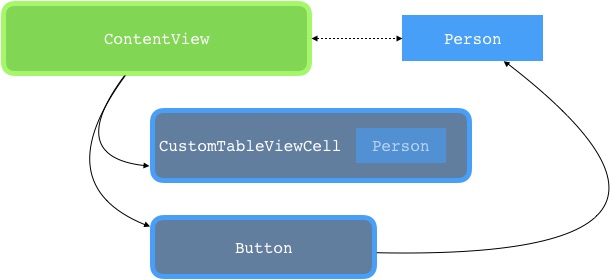
Finally, the ContentView must reflect this change to properly render on screen our CustomTableViewCell.
struct ContentView : View {
    @State private var model = Person(photoName: "photoThumb",
                               title: "Mario Rossi",
                            subtitle: "Amministratore delegato")

    var body: some View {
        VStack {
            CustomTableViewCell(model: model)
            Button(action: {
                self.model.subtitle = "Consigliere"
            }) {
                Text("Change subtitle")
                .foregroundColor(Color.white)
                .padding(EdgeInsets(top: 8, leading: 8, bottom: 8, trailing: 8))
                .background(Color.blue)
                .cornerRadius(8)
            }
        }
    }
}
This time the model variable has the attribute @State: The model owner is the ContentView object, it is then passed by copy - let us remember that we are working with structures and not with classes - to the CustomTableViewCell which, in turn, uses it to render the corresponding fields of its objects: Image and Text.
The button has an action to update the model that changes its subtitle. Since ContentView has added the @State attribute to its model, any change of the latter triggers the update of its body which, in turn, regenerates a new CustomTableViewCell with the brand new content.
You may have noticed that I added the private attribute before declaring the model status variable. This is because, as we explained above, the variables marked as @State belong exclusively to the View that declares them. It is therefore a good idea to reinforce this concept by marking them as private.
We will see in the next article that SwiftUI exposes other ways to manage parameters and injection when we are dealing with situations like the one illustrated above. In this case, in fact, although syntactically and functionally correct, our flow suffers from a small problem: our CustomTableViewCell uses its own copy of the model which in turn is exposed, allocated and managed by ContentView with a private variable.
SwiftUI offers abstractions very similar to the @State attribute to handle these circumstances and allow the model to be propagated correctly where needed.
What happens if we change the model from struct to class?
Although the project will continue to compile and run without problems, unfortunately we will notice that in practice the button will no longer change the content of the subtitle field.
@State works with value types, while classes are reference types: by changing the value of a class marked with the @State attribute, its internal change does not trigger the body update.
– 🖖🏻